Oh my! How did it get to be September already? I feel like it has crept up on me very quickly.
We have had a cracking summer here in the UK, so rather than a slow decline in autumn, we are about to be dumped into it quite unceremoniously.
The one thing I need to think about and plan for at this time of year is how I care for my skin. My skin will become drier and need more moisture at this time of the year. Which means I need richer, more luxurious bases that will help nourish and protect my skin. I just know that the onslaught of inclement weather and artificial heating will ravage the hydration levels in my skin, giving me a chance to get ahead and prepare.
I’ve been using the gorgeous, fresh spicy florals of NO. 1201 - Inspired by: Baies by Diptyque for a while now, and want to share how easy it is to incorporate into your skin care regimen. Why not join me in making this super quick and easy range of skincare products to beautifully transition your skin into autumn?
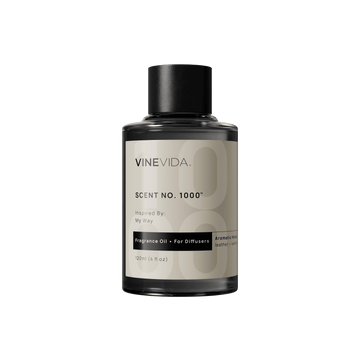
Tell Me All About NO. 1201 - Inspired by: Baies by Diptyque
| Fragrance Type | Who Is It For? | Season | Intensify |
|---|---|---|---|
| Floriental | Women & Me | Summer & Autumn | Balanced |
NO. 1201’s Scent Profile
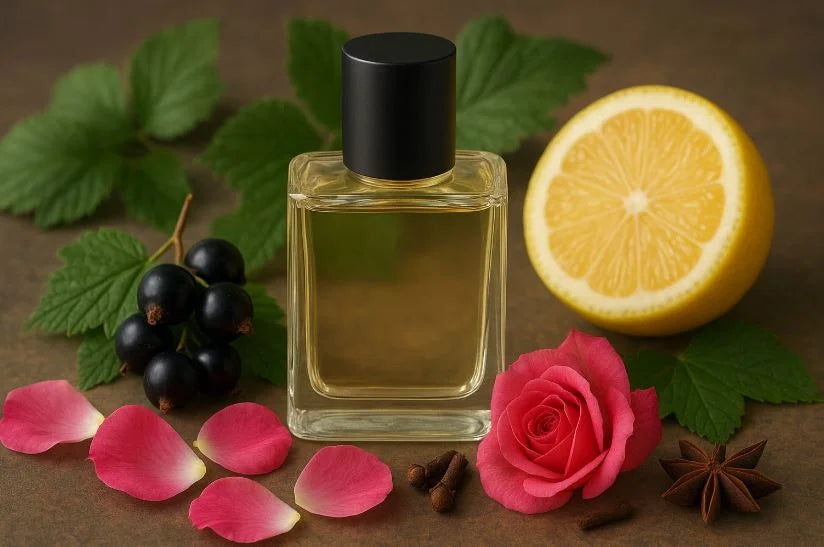
NO. 1201 - Inspired by Baies by Diptyque conjures joyful memories of picking dark blackcurrant jewels nestled beneath fragrant leaves. Ripe, plump, brimming with juice, mouthwatering deliciousness lingers in my memory.
Then soft rose petals entwine themselves through the aroma, weaving a romantic, dewy ribbon through the aroma’s heart.
Then the fragrance is uplifted by green leaves and citrus notes that sparkle before sinking into a light exotic spice bed to balance this luscious fragrance with an enigmatic air of mystery.
Fragrance Notes
-
-
Top Notes: Blackcurrant Leaf, Lemon
-
Middle Notes: Blackcurrant Fruit, Rose
-
Balanced Clove
-
Key Highlights
| Romantic | Fresh | Elegant |
|---|---|---|
| Uplifting | Natural | Sensual |
| Bright | Classic | Warming |
I always choose NO. 1201 for its naturalistic, romantic Floriental scent, which is dominated by natural Rose facets and enriched with a subtle spicy warmth of Clove. It makes for a traditional, elegant aroma to use in skin and body care projects.
Shall we get stuck straight into all the amazing ways we can use this flowery, fruity, deliciousness?
Autumn Skincare Recipes With NO. 1201
I have designed these quick and easy recipes to care for and nourish your precious skin as the weather starts to change, as summer slowly slips away into the crispness of fall.
They address the potential changes your skin needs at this time of the year with targeted hydration, richer nourishment, and more protective ingredients. All laced with the delicious fruity floral aroma of NO. 1201.
I’ve tried to keep the recipes relatively simple, so you can make the most of the same ingredients over and over again. It is more cost-effective in the long run and shows you how far you can stretch some ingredients, using them in a variety of applications.
IFRA Safety
Facial products appear in IFRA category 5B, where NO. 1201 - Inspired by: Baies by Diptyque has a maximum skin safety dilution rate of 15.13%.
This is a very high dilution rate, and you will not need that much. We recommend no more than 5% for this project, and I have used a 3% dilution rate in these recipes.
Super Hydrating Micellar Water

I used to make the swap between using Micellar Water in the summer to using a richer cream cleanser in the autumn and winter. Then I discovered, if I put more in the Micellar Water, it draws moisture into my skin more effectively than the cream cleaner. Now I’m not sure I ever need to go back!
Glycerine is a humectant, which means it draws moisture from the air and plops it right into your skin cells.
Yet, it is so much more than that. Having a Micellar Water with a Glycerine-rich formula:
-
-
Improves hydration & moisture retention
-
Counteracts the potential dryness that cleansing may cause
-
Prevents water loss and supports the skin’s barrier function and the protection it offers
-
Makes the formula gentler on sensitive or dry skin.
-
Soothes, reducing redness and calms irritated or sensitive skin
-
Improves the softness of the skin, leaving it feeling smooth and refreshed
-
Enhances the overall cleansing performance
-
Avoids clogged pores as it is non-comedogenic and a lightweight emollient
-
Improves the texture and application of the Micellar Water
-
Add all those benefits alongside the fabulous rosy aroma of NO. 1201, you will have a winning formula. I will say that homemade Micellar Water does not function quite like the commercial ones, and it may take a small period of adjustment, as you move from using synthetic ingredients to purely natural ingredients.
You Will Need:
-
-
Measuring jug
-
Funnel
-
Stainless steel spoon
-
200ml bottle ( I like the ones with the push top dispensers)
-
Oil and waterproof label
-
Ingredients:
-
-
105 ml of Distilled Water (Aqua)
-
50 ml of Glycerin (Glycerol)
-
Up to 20 ml of Castile Soap (Potassium Cocoate, Jojobate, and Olivate)
-
20 ml of Rosehip oil (Rosa Canina)
-
6 ml of NO. 1201- Inspired by: Baies by Diptyque Soaps & Candles Fragrance Oil
-
Optional: Natural preservative of your choice, follow the manufacturer’s instructions.
Safety:
-
-
Always shake well before use.
-
Take care applying it around the eye area. If any gets into your eyes, rinse well with cool, clean water. If irritation persists, seek immediate medical advice, taking the clearly labelled container with you.
-
Method:
-
-
Organise your workspace and have everything ready to hand.
-
If you plan to use a preservative, consult the manufacturer's instructions, since they often vary from product to product.
-
Measure out the NO.1201 Soaps and Candles fragrance oil and mix with the Rosehip carrier oil, and combine it thoroughly.
-
Measure out the distilled water and the Glycerine, then combine both of these.
-
Add the carrier/fragrance oil mix to the water and Glycerine and stir well.
-
This next step is the tricky bit that needs your attention and patience.
-
You want to add Castile Soap a couple of milliliters at a time to disperse the oils in the water.
-
Stopping to agitate it lightly to disperse the oil mixture. This may need time to let the whole fluid mix settle, to accurately check the water surface for floating oils.
-
You can stop adding Castile soap when the oils no longer rise to the top and settle. If you need to add a little more, that is perfectly fine too.
-
Using a funnel to make life easier, decant into your bottle carefully.
-
Label clearly using an oil and waterproof label and list all ingredients for safety, add a production date, and a 3-6 month expiry date.
-
Also, add the instruction to ‘Shake Well Before Use’.
-
How To Use:
-
-
Always make sure that you carry out a 24-48-hour patch test before your first use. This is especially so if you have sensitive or reactive skin.
-
Always shake the bottle well before every use in order to distribute the ingredients.
-
I always use reusable and washable cotton pads to apply my Micellar Water; it is much more sustainable.
-
Apply liberally onto a cotton pad or makeup remover cloth and work it gently around the face and neck to remove makeup, traces of dirt, and daily grime. Swap out the pad/cloth as soon as it looks a bit grimy and use another clean pad, and so on until your face is thoroughly cleansed.
-
You do not need to rinse it off; leave it on your skin for the Glycerine to get to work.
-
Follow with a light Toner and then a rich Moisturizer or an oil-based Face Serum.
-
Find another great NO. 1201 - Micellar Water recipe in Fragrance Oil Of The Week: NO. 1201 - Inspired By: Baies By Diptyque.
Rich & Rosy Moisturizer

I absolutely adore a rose-based moisturizer; they are my all-time favorite. Just recently, I have been experimenting with some of VINEVIDA’s rose-based fragrance oils. There is something about its pairing with Blackcurrant and green leaves that I just love here. It blends beautifully with the fresh green and rosy vibes of NO. 33 - Fresh Cut Roses.
Talk about a rosy romance made in heaven!
Again, I have gone with a recipe richer in Glycerine to attract moisture and the addition of a solid-state oil rather than a fluid carrier oil. Extra Virgin Coconut Oil brings that protective and nourishing quality. However, because it has a comedogenic rating of 4, I have kept it to a minimum, just enough to capitalize on all its benefits!
You Will Need:
-
-
Microwave-proof measuring jug
-
Stainless steel spoon
-
Jar funnel
-
100ml jar and lid
-
Oil and waterproof label
-
Ingredients:
-
-
25 ml of Aqueous Cream (Various ingredients)
-
20 ml of Shea Butter (Butyrospermum parkii)
-
20 ml of Rosewater (Rosa Damascena)
-
15 ml of Glycerine (Glycerol)
-
10 ml of Rosehip oil (Rosa Canina)
-
10 ml of Extra Virgin Coconut Oil (Cocos nucifera)
-
3 ml of NO. 1201- Inspired by: Baies by Diptyque Soaps & Candles Fragrance Oil
-
3 ml of NO. 33 - Fresh Cut Roses Soaps & Candles Fragrance Oil
-
Optional: Preservative of your choice, please follow the manufacturer's instructions, as they can vary from product to product.
Safety:
-
-
Take care applying it around the eye area. If any gets into your eyes, rinse well with cool, clean water. If irritation persists, seek immediate medical advice, taking the clearly labelled container with you.
-
Shea Butter is derived from a nut, and while usually fairly safe in the refined variety, people who suffer from nut allergies should proceed with caution.
-
Method:
-
-
Take time to organise your workspace and measure out your ingredients to have to hand.
-
First, we want to melt the Shea Butter and the EV Coconut Oil.
-
Use the lowest setting available to you on your microwave. Ideally, set your microwave to 20% power, if possible.
-
Place the Shea Butter and Coconut Oil into a heatproof measuring jug and soften your Shea Butter at 20% power, in short 10-20 second bursts in the microwave.
-
As soon as the Shea Butter and Coconut oil are softened, thoroughly mix in your Aqueous Cream, combining everything completely. (Your oil may melt before the butter, that’s fine, don’t panic)!
-
Add your Rosewater and Glycerin into the cream mix and stir in well.
-
Measure out your fragrance oils into the Rosehip carrier oil and combine thoroughly.
-
Pour the oil mix into the bowl with the cream and mix everything really well.
-
Make sure everything is thoroughly combined and homogenous before decanting into your jar.
-
Decant into the jar using a jar funnel to keep things clean.
-
Wipe the rim meticulously to discourage any mold. Talking of mold, cover the jar with a soft, clean cloth, and leave the cream to cool completely. Do NOT lid while it is warm; the warm, moist environment can encourage mold.
-
Once it is fully cooled, add the lid. And a label clearly listing all of the ingredients.
-
Add a production date to the label and a 3-6 month expiry date.
-
How To Use:
-
-
Don’t forget to do the 24-48 patch test before the first use, please.
-
Apply the Moisturizer liberally to the skin.
-
Use light, upward motions, taking extra care not to drag the skin around the eyes, where the skin is thinner and more delicate.
-
It makes the perfect base for makeup; simply leave it to absorb for a few minutes before applying.
-
Like the idea of creating your own range of gorgeous, rosy skin care? Find out how in The Ultimate Guide to Rose Essential Oil - A Beauty Box in a Flower. You can easily add NO. 1201 alongside any essential oils.
Warm & Nourishing Face Serum

This is such a superlatively simple recipe; it honestly does not get any easier than this.
Yet, this recipe is extremely rich and nourishing for your skin and should deliver impressive results, and fast!
Quick, easy, and effective. What more do you want?
The rich mix of carrier oils has constituents that are renowned for repairing, restoring, and protecting the all-important barrier function of the skin. This is a boon as the weather changes and becomes more inclement.
I have paired it here with the smooth, luxurious warmth of NO. 1200 - Inspired by: Ambre by Diptyque. Naturally, it smells sublime too!
You Will Need:
-
-
Measuring jug
-
Stainless steel spoon
-
50ml rubber-topped dropper bottle
-
Oil and waterproof label
-
Ingredients:
-
-
43 ml of Argan oil (Argania Spinosa)
-
5 ml of Rosehip oil (Rosa Canina)
-
30 drops of NO. 1201- Inspired by: Baies by Diptyque Soaps & Candles Fragrance Oil
-
10 drops of NO. 1200 - Inspired by: Ambre by Diptyque
-
Optional: Preservative of your choice, please follow the manufacturer's instructions, as they can vary from product to product.
Safety:
-
-
Take care applying it around the eye area. If any gets into your eyes, rinse well with cool, clean water. If irritation persists, seek immediate medical advice, taking the clearly labelled container with you.
-
Argan Oil is derived from a nut, and while usually fairly safe in the refined variety, people who suffer from nut allergies should proceed with caution.
-
Method:
-
-
Simply combine all your ingredients.
-
Decant into a bottle using the funnel to keep the bottle oil-free.
-
Label clearly listing all ingredients, and a production and expiry date.
-
How To Use:
-
-
Don’t skip the patch test, please, guys!
-
Apply two drops into the palm of your hand to warm
-
Apply to your face using your first two fingers and work gently into the skin in small upward circular motions.
-
Take care not to drag any delicate areas of skin, like around the eyes.
-
Add a little more if needed, but less is more here. Some days you may need more than others. Listen to your skin.
-
Dry Body Oil

The first thing that happens as soon as the artificial heating goes on in the fall is that I get the winter itch, and so does my husband. Over the years, we have been perfecting how we deal with it, and we’ve learnt a thing or two about what helps our different skin types.
I responded better to Colloidal Oatmeal in the bath and using a dry body oil, whereas he benefits from just a dry body oil. However, I made my own with NO. 1201 last week to get ahead and prepare my skin for the change in seasons, rather than waiting for it to respond. Proactive rather than reactive!
Again, this is brimming with ingredients that care for your skin’s barrier function; if you look after it, it will look after you.
I think you are going to love this paired with NO. 3510 -Inspired by: Bloom (Women) by Gucci!
IFRA Safety:
Body Products appear in the IFRA category 5A, where NO. 1201 - Inspired by: Baies by Diptyque has a maximum skin safety dilution rate of 21.81%.
This is a very high dilution rate, and you will not need that much. We recommend no more than 10% for this project, and I have used a 5% dilution rate in these recipes.
You Will Need:
-
-
Measuring jug
-
Stainless steel spoon
-
Bottle funnel
-
100ml bottle and lid
-
Oil and waterproof label
-
Ingredients:
-
-
50 ml of Coconut MCT oil (Cocos nucifera)
-
30 ml of Argan oil (Argania Spinosa)
-
10 ml of Rosehip oil (Rosa Canina)
-
5 ml of NO. 1201- Inspired by: Baies by Diptyque Soaps & Candles Fragrance Oil
-
5 ml of NO. 3510 -Inspired by: Bloom (Women) by Gucci Soaps & Candles Fragrance Oil
-
Optional: Preservative of your choice, please follow the manufacturer's instructions, as they can vary from product to product.
Safety:
-
-
Not suitable for use on the face (IFRA dilution rate)
-
Take care applying it around the eye area. If any gets into your eyes, rinse well with cool, clean water. If irritation persists, seek immediate medical advice, taking the clearly labelled container with you.
-
Coconut oil and Argan Oil are derived from nuts, and people who suffer from nut allergies should proceed with caution.
-
Method:
-
-
Simply mix all of your ingredients.
-
Using the funnel to keep the bottle oil-free, decant into a 100ml bottle
-
Label clearly on an oil and waterproof label, listing all ingredients.
-
Add a production and expiry date of 3-6 months
-
How To Use:
-
-
You just know I'm going to say, “Patch Test”!
-
Add a dime-sized amount into the palm of your hand and warm gently for a few seconds.
-
Work into your skin, avoiding intimate areas, using long upward strokes.
-
Remove any excess with a paper towel and allow to absorb for a few minutes before dressing.
-
Note, if you use too much, the oil may stain your clothes or linens. Less is more!
-
Cuticle & Chapped Skin Balm

This project builds on your skills a little more with the inclusion of using a wax to get that lovely protective film it provides to care for your cuticles and help guard against chapped skin. Not only is it rich in wax, but also Shea Butter and carrier oils.
It really is a treat for your hands and skin as the autumn advances and the weather starts to really test us. Get ahead of the issue and start preparing and protecting your skin today with this little gem.
It’s really useful to smear across your cheeks and forehead on a wet and windy day if you have to be out in it for hours! Great for sailors, walkers, and outdoor workers.
It has that glorious, fresh, and rosy aroma of NO. 1201, but I wanted to add a little warming comfort with some aromatic ribbons of Vanilla through it. Whenever you want a scent that is a bit mysterious, plump for NO. 105 - Golden Amber & Vanilla
IFRA Safety
Hand products appear in the IFRA category 5C, where NO. 1201 - Inspired by: Baies by Diptyque has a maximum skin safety dilution rate of 20.54%
This is a very high dilution rate, and you will not need that much. We recommend no more than 10% for this project, and I have used a 5% dilution rate in these recipes.
You Will Need:
Do not use equipment that you use for food for this project, due to the wax.
-
-
Microwave-proof measuring jug
-
Heatproof mat
-
Stainless steel spoon
-
100ml squat wide-mouthed jar or a salve tin and lid
-
Oil and waterproof label
-
Ingredients:
-
-
20 gms of Beeswax (Cera alba)
-
20 gms of Shea Butter (Butyrospermum parkii)
-
43 ml of Argan oil (Argania Spinosa)
-
10 ml of Rosehip oil (Rosa Canina)
-
5 ml of NO. 1201- Inspired by: Baies by Diptyque Soaps & Candles Fragrance Oil
-
2 ml of NO. 105 - Golden Amber & Vanilla Soaps & Candles Fragrance Oil
-
Optional: Preservative of your choice, please follow the manufacturer's instructions, as they can vary from product to product.
Safety:
-
-
Take care applying it around the eye area. If any gets into your eyes, rinse well with cool, clean water. If irritation persists, seek immediate medical advice, taking the clearly labelled container with you.
-
Method:
A Note Before We Start:
Ideally, you want to heat waxes, butters, and oils as little as possible and avoid heating them in the microwave, but we are going for ease here! You can heat them in a double boiler if you wish, but we are making so little, it is barely worth getting it out of the cupboard!
-
Take the time to organise and measure out your ingredients.
-
Place your wax in the microwave-proof jug and set your microwave to the lowest setting possible, and aim to melt the wax in 30-second bursts.
-
As soon as it is half molten, add the Shea Butter and continue in 30-second bursts, until both the wax and the butter are molten and fluid.
-
Remove from the microwave and set on a heatproof mat to cool for five minutes.
-
Add your fragrance oils to your carrier oils and combine thoroughly, and then add them to the molten wax and butter.
-
Stir well for a couple of minutes to evenly distribute the fragrance oils.
-
Immediately pour into a squat, wide-mouth jar or a salve tin and cover with a soft, clean cloth, and allow to cool fully. Do not add the lid yet!
-
We don’t add the lid while it is still warm and moist, as it can encourage the formation of mold and bacteria. Allowing it to cool will mitigate this. As soon as it is cold, add the lid.
-
Label clearly, listing all ingredients, and add a production date and a 3-6 month expiry date.
How To Use:
-
Yes, you guessed it. Please do a 24-48 hour patch test before first use.
-
Apply with your fingers where needed and massage gently into the skin.
The Final Word
Open a bottle of NO. 1201 - Inspired by Baies by Diptyque, and step into those gloriously fragrant memories of Blackcurrant picking in the height of summer. Festooned with bowers of soft roses, this is a romantic scent to fall head over heels in love with.
Sparkling citrus notes meet the uplifting fresh green leaves before discovering the fragrant juicy jewels nestled amongst them. Soft, powdery Rose petals flutter through the heartspace into a tempting bed of warm spice and Clove.
It makes for a classically elegant and romantic aroma. Full of fresh, bright, and natural aromatics with a subtly warm and sensual finish.
These projects are so quick and easy that you could complete them all in a couple of hours. Why not have a go and discover the Floriental nature of NO. 1201. Once discovered, you will not want to be without it.
Explore more fun ideas and recipes in Fragrance Oil Of The Week: NO. 1201 - Inspired By: Baies By Diptyque.